Perspective Drawing Tutorial for Beginners and How it Relates to Anime
To put it in very simple terms perspective is objects that are further away appearing smaller than those that are closer to the viewer.
In art the correct use of perspective is very important as it can make a flat image appear to have depth and volume.
This tutorial will illustrate the basics of perspective drawing and explain how these are applied to drawing anime and manga.
Use of Perspective in Anime & Manga
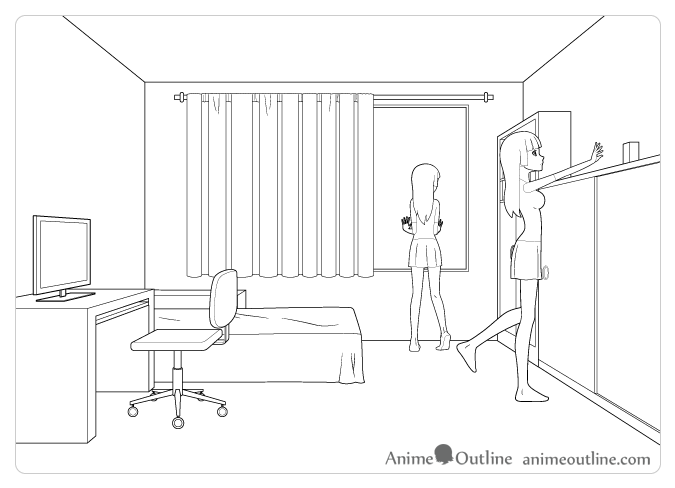
A scene like the room and character drawing above is fairly common in anime and manga.
To be able to make a proper drawing of a room like this knowledge of perspective is absolutely essential. Even if you are not particularly interested in anime but simply like to sketch and don’t know much about perspective drawing this tutorial can still be very helpful.
The Basics of Perspective Drawing
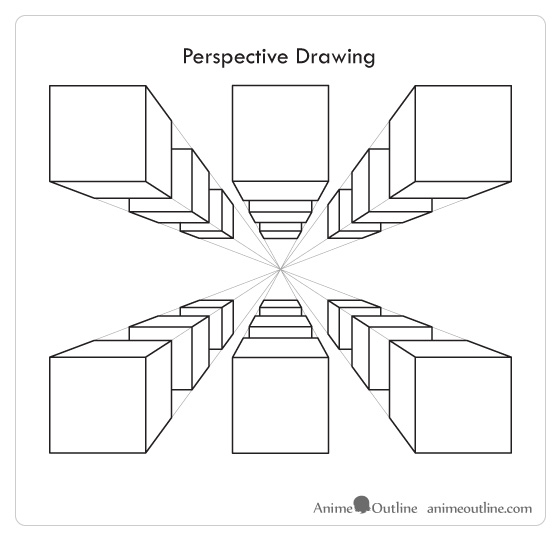
The above is a basic example of perspective drawing. Objects getting smaller the further they go into the distance.
You could continue drawing cubes further and further back between the perspective lines until they turn into a dot
Drawing With No Perspective
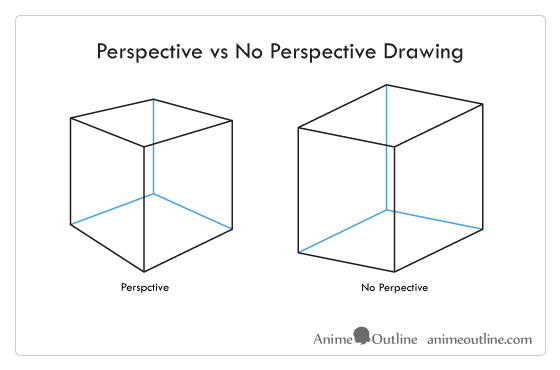
In a cube all sides are normally equal in length but above illustration you can see how the sides of the first cube (drawn in perspective) that are further away are drawn smaller while the sides that are closer are drawn larger.
In the second (non-perspective) drawing where the back and front sides are drawn the same size the cube looks odd and distorted.
The Horizon Line
As already mentioned perspective is objects getting smaller as they go off into the distance. The point or points at which the objects in a drawing vanish into the distance or become a dot are know as the vanishing points. In one point and two point perspective these are always located on a horizontal line or the “horizon line” also known as the “eye level”.
The reason it is called the “eye level” is because it literally is where the viewers eyes would be in relation to the scene in the picture if the viewer was actually there. Imagine the picture as if you are looking out a window.
The horizon line in most examples in this tutorial is shown above the object but it is important to know that it can also be below or behind an object. The position depends on where the viewer’s eyes are. If the viewer is looking at an object from above then the horizon line will be above it, if you are looking at it form below then the horizon line will be below the object and if they are looking directly at the object then the horizon line will be behind it.
The Three Types of Perspective
There are three types of perspective in total, one point perspective and two point perspective as mentioned earlier and the less common three point perspective (also the most complicated).
One Point Perspective
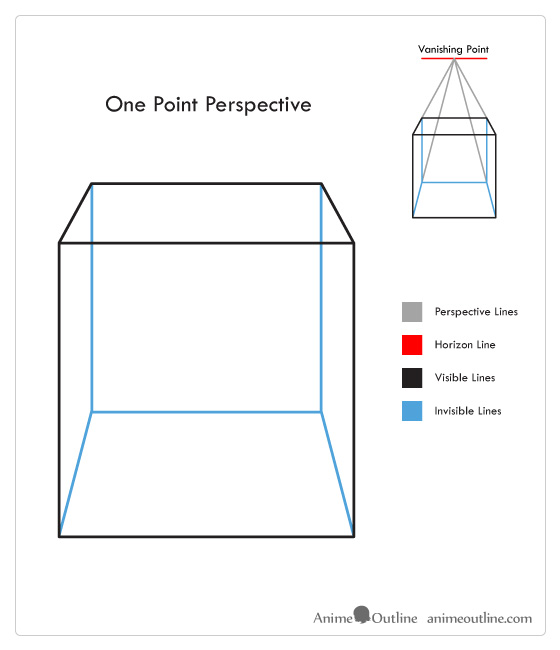
One point perspective is the easiest to draw in as there is only one vanishing point. This type of perspective is good to use when you are looking at the center of an object or a scene that is facing direct towards the viewer.
Two point Perspective
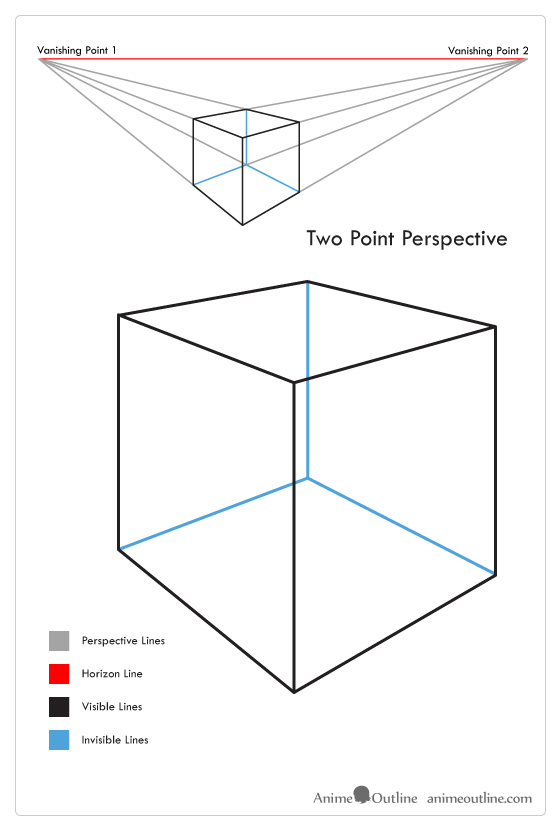
Two point perspective has two vanishing points (both always located on the horizon line) and is probably the most common. You will want to use this when drawing most objects or scenes.
Three Point Perspective
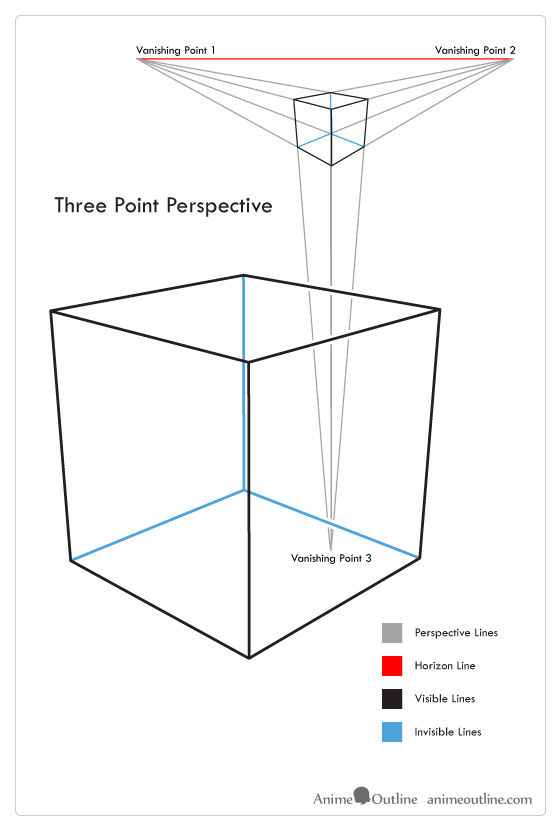
Three point perspective has three vanishing points and is often used when drawing large objects such as buildings.
The third vanishing point can also be above an objects. An example would be looking at a building from below. The top of the building will appear far smaller than the bottom.
Drawing Area & Vanishing Points
It’s very important to note that in many cases the vanishing points and even the horizon line can be off of the actual drawing area. This may sound confusing but simply look at the examples in this tutorial where there is a smaller drawing of the same object in order to show the perspective lines. If you try and add these lines to the larger object you will see that the vanishing points will not fit within the frame of the drawing.
The Importance of Eye Level
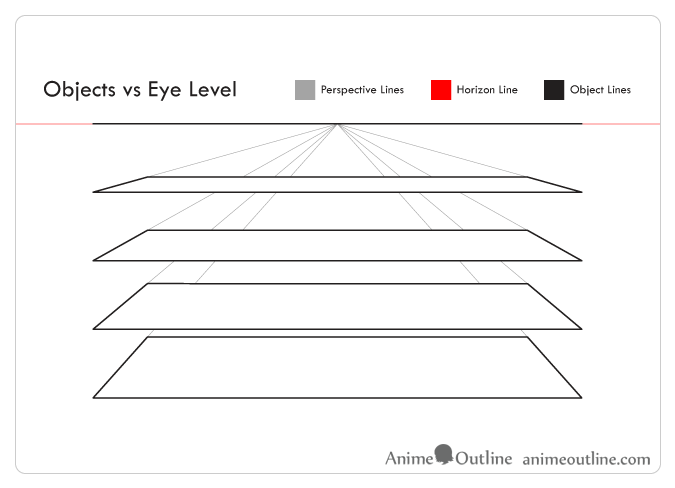
In the above example you can see how the vertical positioning of an object in relation to the eye level changes it’s appearance for the viewer. You can try this for yourself by first putting a sheet of paper on the floor and then bringing higher up towards your eyes in the same position. The closer it gets to your eyes the narrower it will appear until it basically become a line (if you look directly at the side of the sheet). A similar effect will happen if you hold it over your head and bring it down (looking at the bottom).
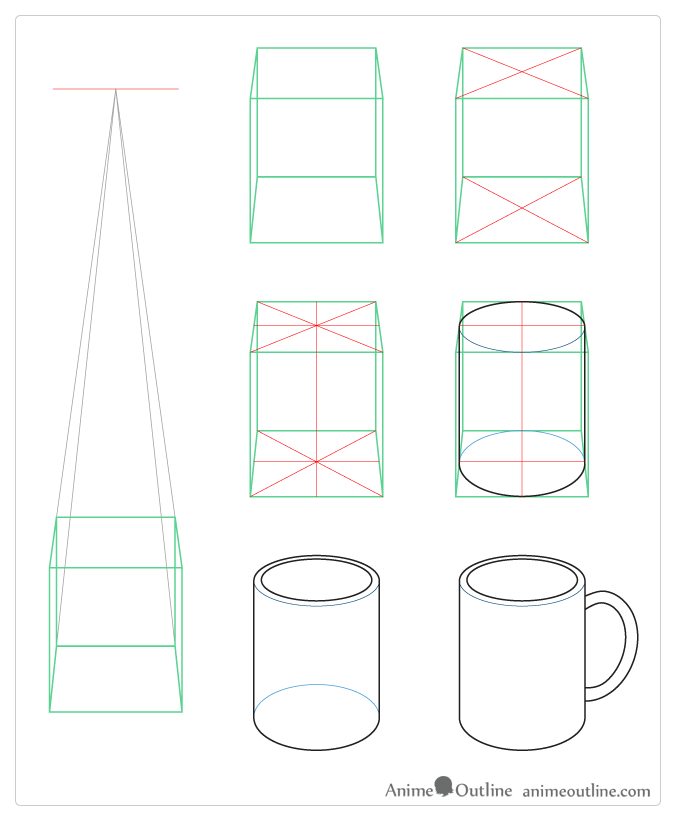
If we apply this to drawing a simple cup in correct perspective the bottom of the cup will be drawn rounder (more vertically stretched than the top because in this case the cup would be below the viewer and therefore the top would be closer to the viewers eye level. If the cup was above the viewer than this would be reversed (rounder top).
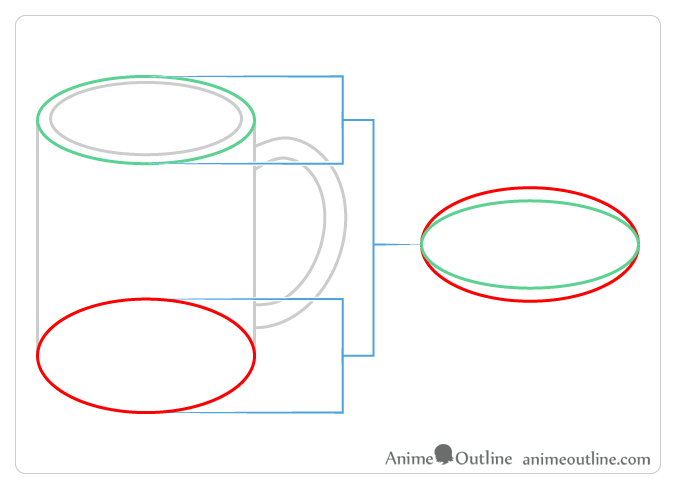
If you draw using the guidelines shown above and actually draw out all of your perspective lines and vanishing points properly you should end up with a correct structured drawing automatically. But if you are drawing a scene that has multiple objects or multiple panels of a manga it can get very time consuming to draw out all the guide lines every time. Therefore when you are drawing without guidelines keep this in mind and draw accordingly.
How Perspective Drawing is Applied in Anime and Manga
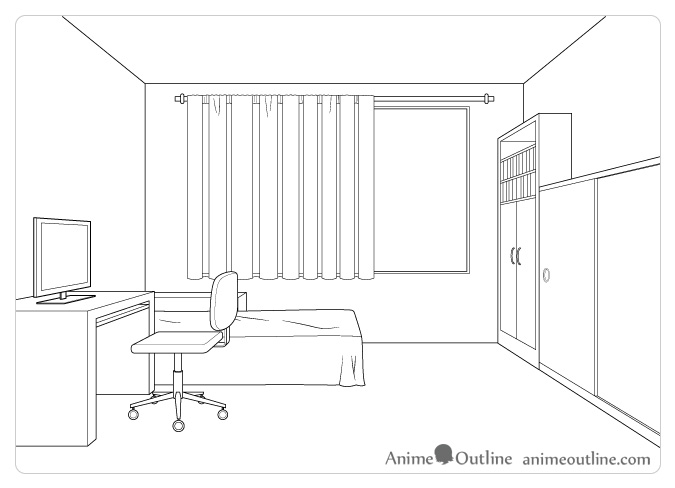
The above drawing of a bedroom (a fairly common scene in anime and manga) is done in one point perspective. If you were to add perspective lines to the objects in the picture you would see that they all eventually converge on one single point (the vanishing point).
Just like in the bedroom drawing example you can see perspective drawing in many scene of anime or manga. Rooms, furniture, cities, roads, buildings and even people look far better when drawn in correct perspective.
For more on drawing a room in one point perspective see:
One Point Perspective Room Drawing Tutorial – Step by Step
Perspective When Drawing Anime Characters
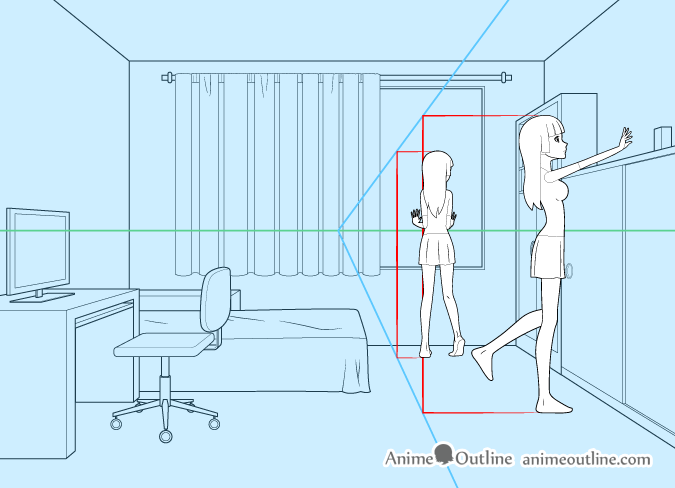
A very basic example of perspective in anime would be something as simple as a character that is standing in the foreground appearing larger than a character that is standing in the background.
If you want to quickly get a rough idea of how big a character should be when standing in the foreground as compared to them standing in the background (or in reverse) you can use the method in the above example.
- Draw a vertical line as tall as the character you want to project from (shown in red)
- Draw perspective lines (shown in blue) from the vanishing point that each touch the top and bottom of the height line.
- Draw a second vertical line (shown in red) between the same perspective lines in the foreground or background of the initial character drawing.
- Draw horizontal lines from the second height line to anywhere in the picture to and draw your character between those
It’s important to note that this method only works if the character is in roughly the same position and is not one hundred percent accurate but it can prevent you from making major mistakes if used correctly.
If you would like to estimate the size of a character in a different position than the one you are projecting from you could draw a rough shape of the character in the same position first and draw them in a different position based off of the proportions of the initial position.
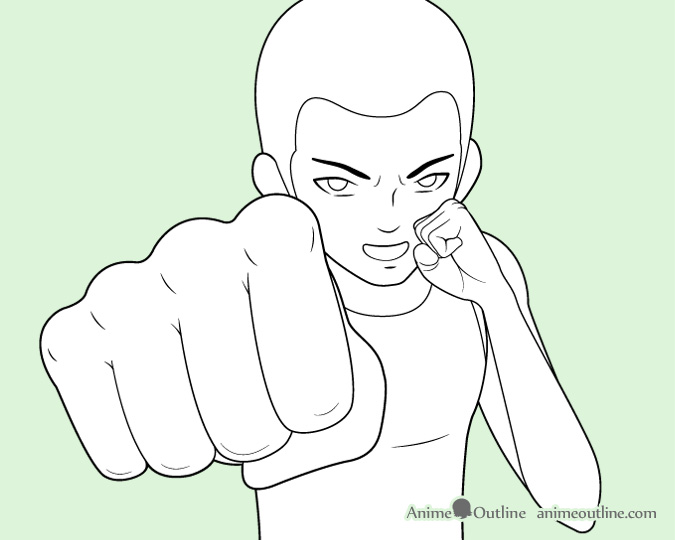
A more complex example would be something like a punch that really appears to be in your face (like the above drawing). This can be achieved by drawing a fist much larger than the rest of the body parts of the character it belongs to.
If you want to see a real example of this just hold your hand right up to your face. Notice how big it looks in comparison to other objects due to perspective.
Learning to Draw in Perspective
If you have not heard of perspective drawing before it may seem like a lot of information to take in but do not let it overwhelm you. Perspective drawing is not that complicated. If you’ve been drawing for a while you may have already drawn things in perspective without even realizing it. Now that you know a little bit about how perspective works you can try applying it to your art knowingly.
Posting Komentar untuk "Perspective Drawing Tutorial for Beginners and How it Relates to Anime"